Copper Canyon Golf Club – Lake/Mountain | Par 72
| Tees | Yardage | Slope | Rating |
|---|---|---|---|
| Black | 6865 | 130 | 72.0 |
| Copper | 6476 | 126 | 69.8 |
| Silver | 5821 | 120 | 68.3 |
| Jade | 5065 | 116 | 68.5 |
Lake Hole by Hole:
1 2 3 4 5 6 7 8 9
Copper Canyon Golf Club – Mountain/Vista | Par 72
| Tees | Yardage | Slope | Rating |
|---|---|---|---|
| Black | 7029 | 129 | 72.7 |
| Copper | 6611 | 124 | 70.4 |
| Silver | 5952 | 115 | 67.4 |
| Jade | 5270 | 120 | 69.1 |
Mountain Hole by Hole:
1 2 3 4 5 6 7 8 9
Copper Canyon Golf Club – Vista/Lake | Par 72
| Tees | Yardage | Slope | Rating |
|---|---|---|---|
| Black | 6698 | 129 | 71.1 |
| Copper | 6283 | 124 | 68.8 |
| Silver | 5753 | 115 | 66.5 |
| Jade | 4965 | 116 | 67.6 |
Vista Hole by Hole:
1 2 3 4 5 6 7 8 9
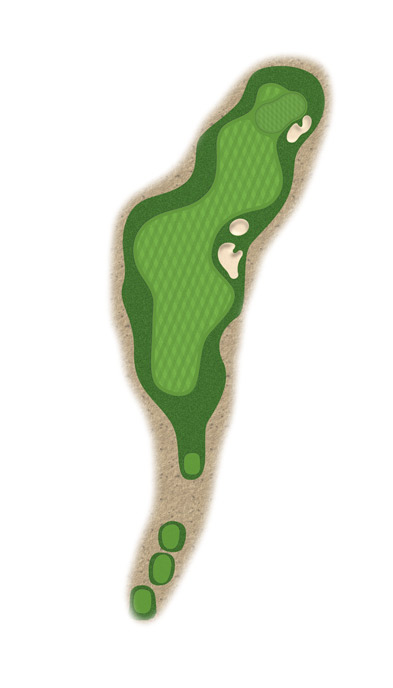
Description
Get your round off to a good start by hitting this relatively wide fairway, but be sure to avoid the large group of bunkers down the right-hand side. Longer hitters may want to take less than driver off the tee to ensure a good angle into a green that is well-protected by two greenside bunkers.
| Black | 387 Yards | 9 Handicap |
| Copper | 367 Yards | 9 Handicap |
| Silver | 337 Yards | 9 Handicap |
| Jade | 287 Yards | 9 Handicap |
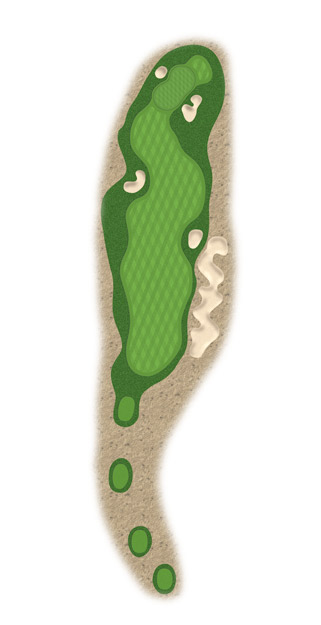
Description
This short Par 4 offers the player a good chance at birdie. A good drive in the center of the fairway will leave a short second shot into the green, but be sure to leave yourself on the proper level of the green as there is a steep ridge running through the center.
| Black | 366 Yards | 13 Handicap |
| Copper | 340 Yards | 13 Handicap |
| Silver | 296 Yards | 13 Handicap |
| Jade | 246 Yards | 13 Handicap |
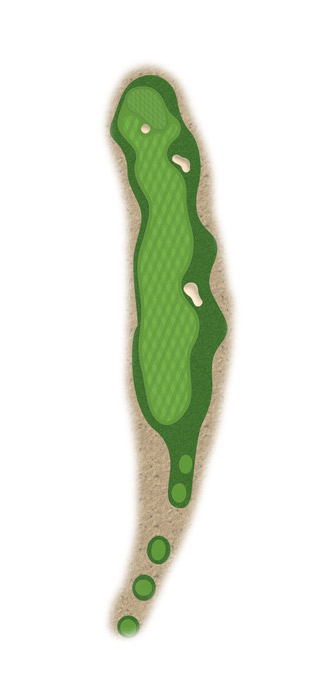
Description
This long Par 4 is the #1 handicap hole on the course. Stay right off the tee to avoid going down into the desert running along the left-hand side of the fairway. A well-placed tee shot will leave you with a mid to long iron into this two-tiered green. Par is a good score on this hole.
| Black | 457 Yards | 1 Handicap |
| Copper | 424 Yards | 1 Handicap |
| Silver | 390 Yards | 1 Handicap |
| Jade | 340 Yards | 5 Handicap |
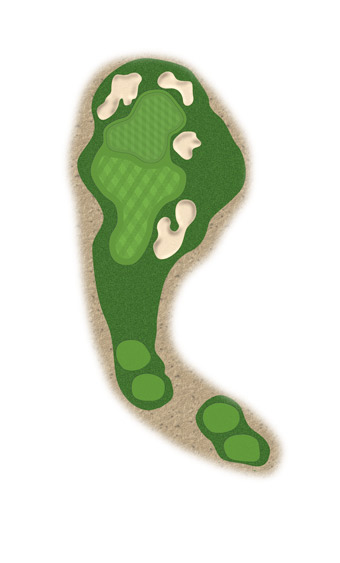
Description
On this medium-length Par 3 take dead aim at the flagstick, but be sure not to go long or you will find the deep bunker behind the green leaving a difficult second shot.
| Black | 170 Yards | 17 Handicap |
| Copper | 154 Yards | 17 Handicap |
| Silver | 134 Yards | 17 Handicap |
| Jade | 120 Yards | 17 Handicap |
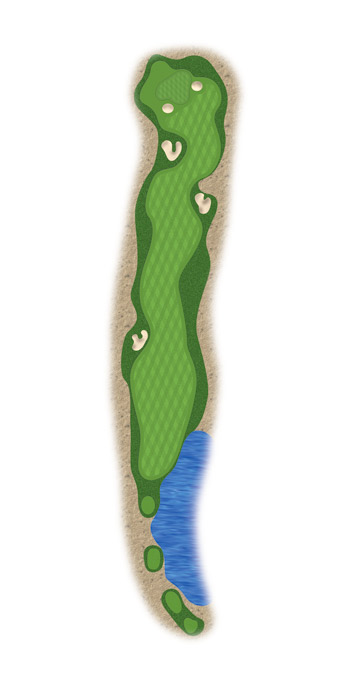
Description
This short Par 5 offers players a chance to reach the green in two with a pair of well-struck golf shots. For players that decide to lay up, be aware of the large bunker that sits down the left side of the fairway about 90 Yards out, the large collection area to the right of the green offers a much better angle in.
| Black | 500 Yards | 7 Handicap |
| Copper | 487 Yards | 7 Handicap |
| Silver | 480 Yards | 7 Handicap |
| Jade | 440 Yards | 7 Handicap |
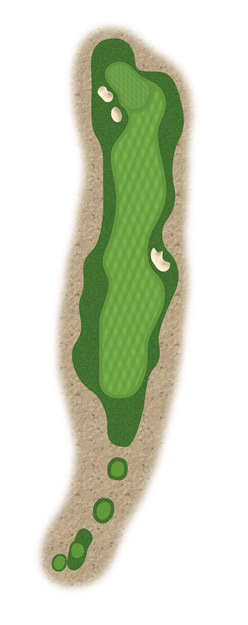
Description
Avoid the deep fairway bunkers off the tee, but the left side of the fairway offers the best angle into his three-tiered green. Be sure to hit the proper tier of the green with your second shot or face a roller-coaster putt. If you choose you can play out to the right to have a good angle to chip into the green.
| Black | 428 Yards | 5 Handicap |
| Copper | 405 Yards | 5 Handicap |
| Silver | 380 Yards | 5 Handicap |
| Jade | 345 Yards | 3 Handicap |
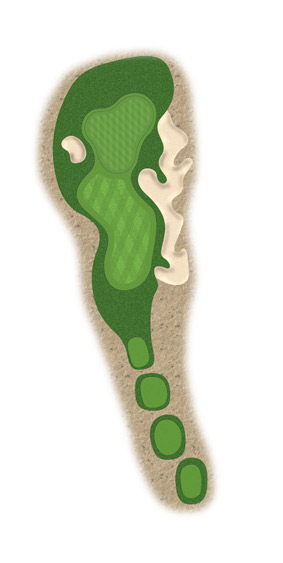
Description
This long Par 4 will have players hitting a long-iron into a three-tiered green. A tee shot right in the center will result in the ball feeding down, into the back corner of the green. Beware of the bunkers guarding the front of the green as they leave extremely difficult second shots.
| Black | 193 Yards | 15 Handicap |
| Copper | 170 Yards | 15 Handicap |
| Silver | 143 Yards | 15 Handicap |
| Jade | 117 Yards | 15 Handicap |
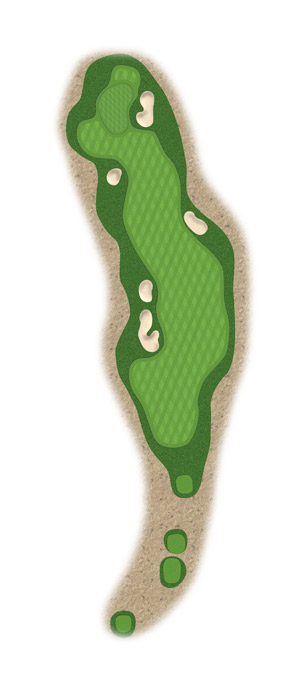
Description
Longer hitters can aim at the bunker in the center of the fairway and carry it leaving a very short second shot into this relatively flat green. Players who choose to lay up off the tee will find a large fairway and simple, but longer, second shot into the green.
| Black | 390 Yards | 11 Handicap |
| Copper | 354 Yards | 11 Handicap |
| Silver | 330 Yards | 11 Handicap |
| Jade | 290 Yards | 11 Handicap |
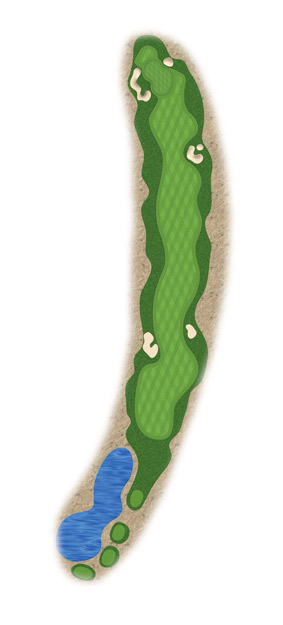
Description
This long Par 5 will challenge players as they finish their outward nine. The smart play is to lay up to the right of the bunker off the tee which leaves you with a large landing area for your second shot. Two well-executed shots will leave you with a short approach into another demanding green.
| Black | 570 Yards | 3 Handicap |
| Copper | 547 Yards | 3 Handicap |
| Silver | 520 Yards | 3 Handicap |
| Jade | 477 Yards | 1 Handicap |
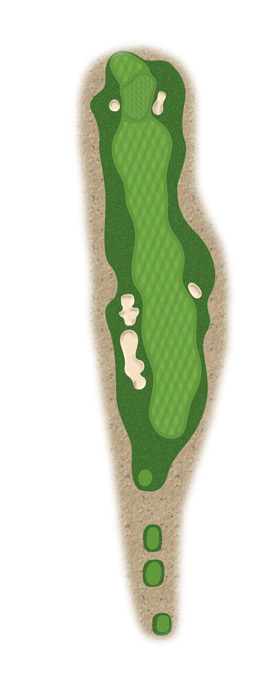
Description
This long Par 4 is only made longer by the wind coming off the White Tank Mountains. Hit a good tee-shot down the right-hand side of the fairway to avoid the bunkers left leaving you with a long-iron or wood into a green protected by two bunkers on either side.
| Black | 453 Yards | 2 Handicap |
| Copper | 413 Yards | 2 Handicap |
| Silver | 383 Yards | 2 Handicap |
| Jade | 333 Yards | 4 Handicap |
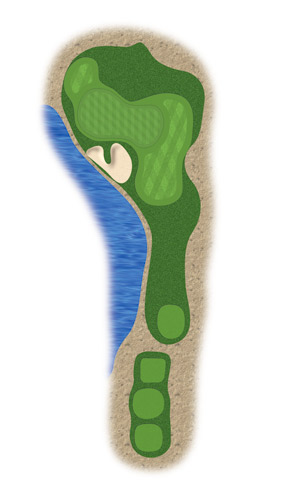
Description
Club selection is vital on this short Par 3. The wide, but shallow, green is protected in front by a deep bunker.
| Black | 163 Yards | 18 Handicap |
| Copper | 148 Yards | 18 Handicap |
| Silver | 130 Yards | 18 Handicap |
| Jade | 110 Yards | 18 Handicap |
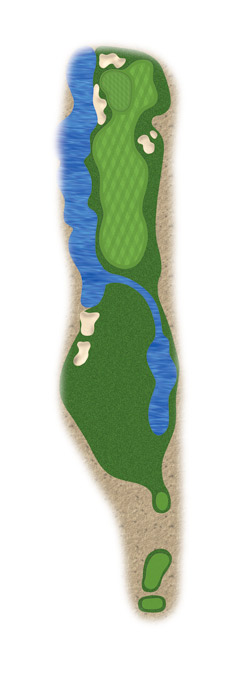
Description
This Par 5 is the signature hole. The elevated tee offers a picturesque backdrop for your tee shot. Stay left with your drive to avoid the water running down the left hand side. Longer hitters may consider laying up off the tee to avoid the creek that runs through the center of the fairway. On your second shot be sure to avoid the water left and the bunker short of the green on the right. The large green slopes back to front allowing players to stop their approach shots for a good chance a birdie.
| Black | 520 Yards | 6 Handicap |
| Copper | 497 Yards | 6 Handicap |
| Silver | 487 Yards | 6 Handicap |
| Jade | 420 Yards | 2 Handicap |
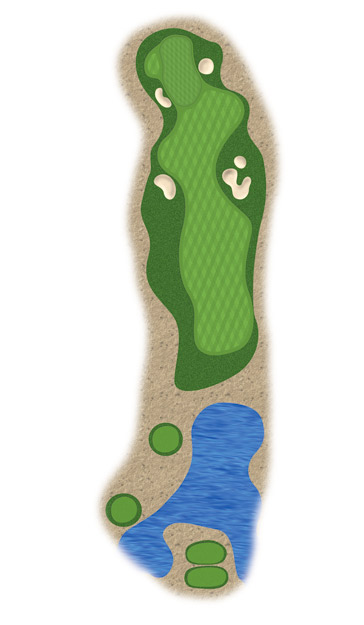
Description
Be aggressive off the tee on this drivable Par 4, but an errand tee shot will get you in trouble. This hole should give a great chance at birdie.
| Black | 322 Yards | 14 Handicap |
| Copper | 309 Yards | 14 Handicap |
| Silver | 302 Yards | 14 Handicap |
| Jade | 255 Yards | 14 Handicap |
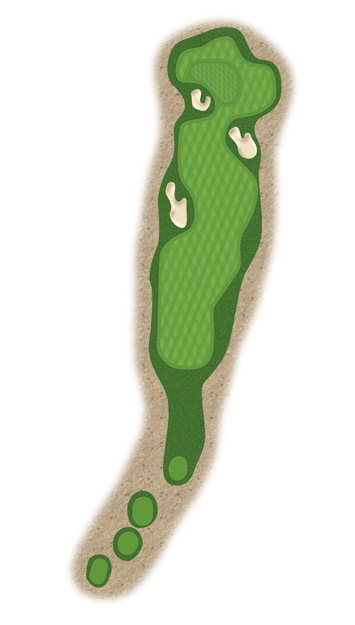
Description
Check the pin position to determine your tee shot. A pin tucked in the back corner may warrant a lay-up off the tee to ensure a good angle into the green, while you may want to attack a forward pin. Be aware of the steep ridge running through the center of the green as well as the large bunker guarding the front.
| Black | 338 Yards | 12 Handicap |
| Copper | 321 Yards | 12 Handicap |
| Silver | 298 Yards | 12 Handicap |
| Jade | 261 Yards | 12 Handicap |
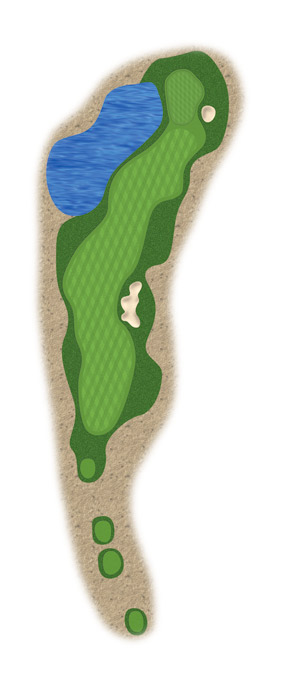
Description
This dogleg right Par 4 gives players yet another choice off the tee. You may choose to lay-up to the right which leaves a good angle into this green which is protected in front by water, or longer hitters may try to carry the fairway bunker left which leaves just a wedge into the green, but be aware of the desert along the right-hand side.
| Black | 423 Yards | 4 Handicap |
| Copper | 380 Yards | 4 Handicap |
| Silver | 356 Yards | 4 Handicap |
| Jade | 307 Yards | 4 Handicap |
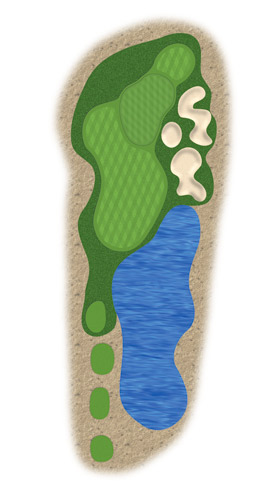
Description
This long Par 3 features a large green protected by a group of bunkers along the right-hand side. A large collection area to the right of the green offers a straightforward up and down.
| Black | 203 Yards | 16 Handicap |
| Copper | 177 Yards | 16 Handicap |
| Silver | 153 Yards | 16 Handicap |
| Jade | 128 Yards | 16 Handicap |
Description
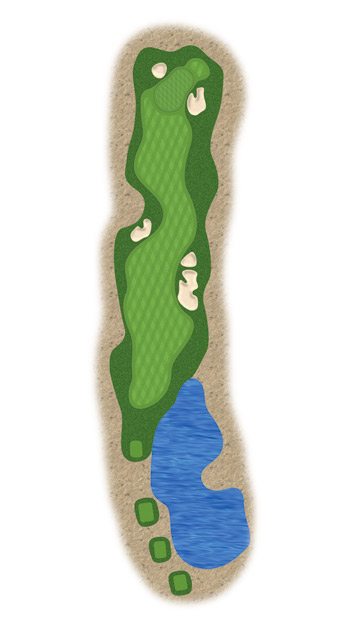
This challenging Par 4 usually plays directly back into the wind making it play much longer than its’ yardage. The green is protected on either side by two deep bunkers and features a mound in the middle penalizing approach shots hit to the wrong side.
| Black | 405 Yards | 10 Handicap |
| Copper | 382 Yards | 10 Handicap |
| Silver | 352 Yards | 10 Handicap |
| Jade | 302 Yards | 8 Handicap |
Description
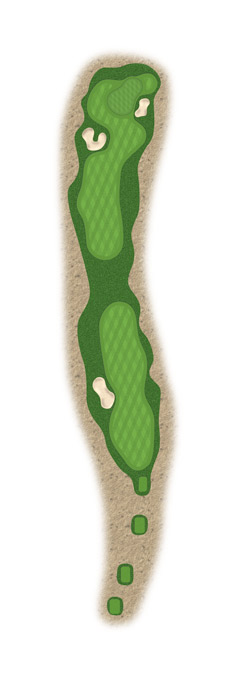
The finishing hole is a long Par 5 that plays, once again, back into the wind. A tee shot avoiding the bunker along the right will leave a straightforward lay-up to a wide fairway. Approach shots landing on the front of the green may be caught by the false front. A birdie on this hole would be a very rewarding way to finish your round.
| Black | 557 Yards | 8 Handicap |
| Copper | 524 Yards | 8 Handicap |
| Silver | 474 Yards | 8 Handicap |
| Jade | 430 Yards | 6 Handicap |

